

Here is a step-by-step guide to setting up Google Adwords.
Here is a step-by-step guide to setting up Google Adwords.
Step 1 : Prepare to setup!
Before you start to set your campaign – there is certain information that you will need in order to setup
The Adwords system times out if you take too long to set up, which means starting from the beginning again which is highly irritating!!
You will need:
# A website!!!
# Your name or company name
# an email account so that you can receive the Google confirmation email and alerts. This email is also what you will use to log in to your account
# your TAX ID details if you are setting up a company account – You cannot change your tax information at a later date so this is very important!
# A credit or charge card to activate the account – you will be charged $10 or equivalent as a setup fee
You will also need:
Some Sample Text to set up your first ad!
Google Adwords will not let you complete the setup unless you have some sample text to put in to your ad.
Take some time to think about your product or service. If you are not sure then do some searches online to see what other ads say – don’t copy them directly, just get an idea of what you want to say.
You don’t have to get it right first time, this is just to set up the account. You can go back in to the Google Adwords control panel and change the text later
For your first Ad you will need:
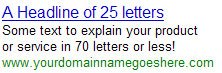
Here’s an example I have created for you:
Home Inspections (25 Characters max)
Need a Home Inspection? We have (35 characters max)
Certified Inspectors in your area! (35 characters max)
www.yourdomaingoeshere.com
The Landing Page in your ad should be your actual page!
Eg. https://abuyerschoice.com/home-inspector-directory/ted-clarke.html
…and not forgetting…
Some Sample Keywords!
Keywords or keyphrases are the words that a person uses while they are searching on Google.
Google Adwords won’t allow you to complete the setup without at least one keyword. I have created a complete list of keywords for you to use. Just cut and paste the entire list.
|
"a pro home inspection" [a pro home inspection] "ashi home inspection" [ashi home inspection] "best home inspection" [best home inspection] "building inspection" [building inspection] "building inspectors" [building inspectors] "certified home inspection" [certified home inspection] "certified home inspections" [certified home inspections] "certified home inspector" [certified home inspector] "certified home inspectors" [certified home inspectors] "commercial inspection" [commercial inspection] "commercial property inspection" [commercial property inspection] "final home inspection" [final home inspection] "home building inspection" [home building inspection] "home building inspections" [home building inspections] "home buyers inspection" [home buyers inspection] "home inspection" [home inspection] "home inspection companies" [home inspection companies] "home inspection company" [home inspection company] "home inspection foundation" [home inspection foundation] "home inspection radon" [home inspection radon] "home inspection report" [home inspection report] "home inspection service" [home inspection service] "home inspection services" [home inspection services] "home inspections" [home inspections] "home inspector" [home inspector] "home inspectors" [home inspectors] |
"homes inspection" [homes inspection] "homes inspections" [homes inspections] "house inspection" [house inspection] "house inspections" [house inspections] "house inspector" [house inspector] "house inspectors" [house inspectors] "inspect home" [inspect home] "licensed home inspection" [licensed home inspection] "nachi home inspection" [nachi home inspection] "new home inspection" [new home inspection] "new home inspections" [new home inspections] "new home inspector" [new home inspector] "pro home inspection" [pro home inspection] "professional home inspection" [professional home inspection] "professional home inspections" [professional home inspections] "property inspection" [property inspection] "property inspections" [property inspections] "property inspector" [property inspector] "quality home inspection" [quality home inspection] "real estate home inspection" [real estate home inspection] "real estate inspection" [real estate inspection] "real estate inspector" [real estate inspector] "real estate inspectors" [real estate inspectors] "residential home inspection" [residential home inspection] "residential inspection" [residential inspection] "residential inspectors" [residential inspectors] |
*** You can also add geographical keywords to each of these phrases.
That’s the preparation over!
Now you are ready to setup…
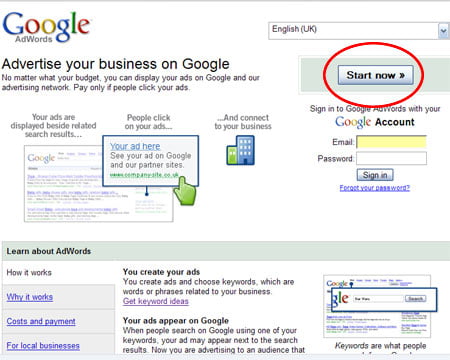
Step 2 : Go to the Adwords Login Page and start the setup procedure
Click here to go to the Google Adwords Login
When you get to the login screen click on the button on the top right that says ‘START NOW’
Step 3 : Choose the Standard Edition
Pick the standard edition. (You can go back and change this setting at any time). Then add your country, telephone number, and location details.
- Follow the instructions: provide your email address and create a password. If you have a gmail address, use it. If not, create an account with whatever address you normally use.
- Select your currency preference.
- Verify your email address by replying to the email sent to you by Google.
- Sign in to your new account with the password you created.
Once you begin to create your account you will land on a page that has a large button that says: “Create Your First Campaign”.
Step 4 : Setup your Ad
1. Location and Language
In order to setup your starter ad, you will need the details mentioned in section 1.
The location selection is very important! You only want to show the ads to people in your service area! If you only serve Halifax, NS, then only show ads to searchers here. This will save you money!
- Select your language of preference: English. Select only English unless you create ads in other languages.
- VERY IMPORTANT: Select your target area by location. This means you will only show your ads to people in your service area. This is essential!
- Click on “Change Targeting”
- Use the Mapping Tool to select only those areas where you serve.
- Once you’ve slected your target area click “continue”.
Now you will set up your ad and select your keywords.
Step 5 : Setup your Ad
2. Write your Ad
Remember the preparation I asked you to do in Step 1!
You will need to know the full web addresss of the page or website you want to link to… eg.
You will also need to create an ad using the preparation steps at the beginning of this article – you can go back and edit this setting at any time.

The example from Step 1:
Keep this page open while you setup then cut and paste
Home Inspections (25 Characters max)
Need a Home Inspection? We have (35 characters max)
Certified Inspectors in your area! (35 characters max)
www.yourdomaingoeshere.com
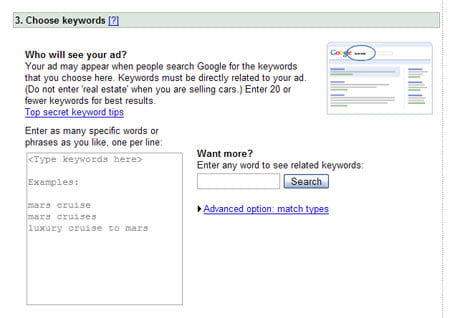
Step 6 : Setup your Ad
3. Choose Keywords
You will need to know the full web addresss of the page or website you want to link to (eg https://abuyerschoice.com)
You will also need to create an ad using the preparation steps at the beginning of this article – you can go back and edit this setting at any time.
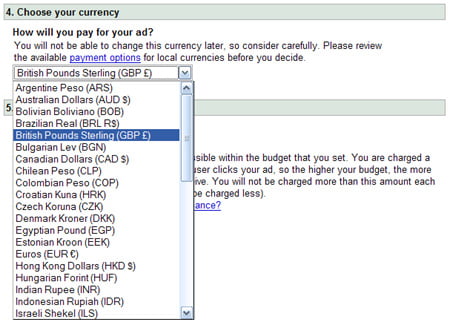
Step 7 : Setup your Ad
4. Choose Your Currency
Once you have chosen this setting it is not possible to change it, so think about which currency you want to use. You can set up other campaigns for other currencies later.
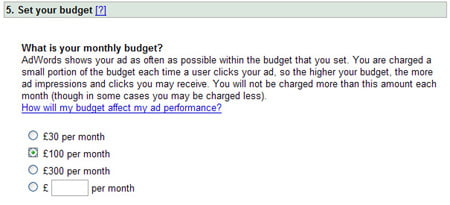
Step 8 : Setup your Ad
5. Choose your budget
The amount you set for your budget is the maximum amount you will be charged in any given month. You will never exceed that amount.
Be realistic though, if you are targeting a competitive area where it costs $2 a click – setting a budget of $10 a day means that the system can only show your ads a few times a day before your budget is used up.
***Also, it is important to set as high a maximum cost per click that you can. This will mean your ad will rank as high as possible. Remember, this is only what you are willing to pay, not what you will actually pay. Most people set this too low and therefore their ads don’t rank high enough to get many “clicks”. In a small geographic area it is unlikely your maximum cost per click will be very high.
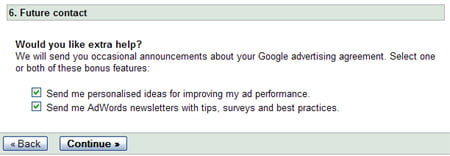
Step 9 : Setup Your Ad
6. Future Contact
This is where you add your contact details. Don’t worry, you’re not going to receive any spam or constant Google emails, but it is important to receive alerts when your ads aren’t showing.
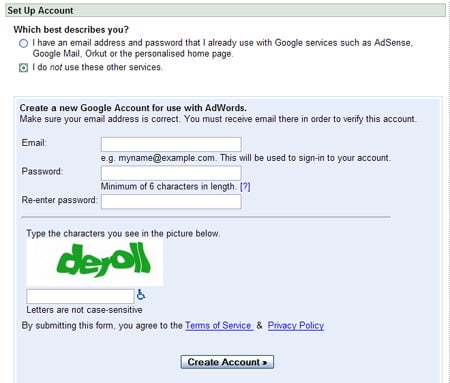
You’re Almost There!
Set Up Account
All you need to do now is pick your login email and create your account to get started! If you already use Google services, you can use your existing login.
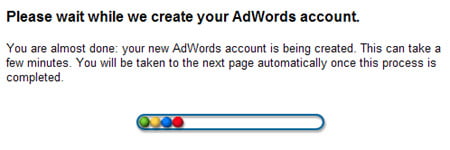
Step 10 : Congratulations!!! You have now set up your Adwords Ad Campaign
You will now receive a confirmation email from google and instructions on how to activate your account.
This essentially means how you plan to pay for your ads. My recommendation is to “Post Pay”. This means your ad runs continuously and Google charges your credit card (which it keeps on file) after you’ve spent a certain amount. You can also give them a certain amount and then run your ads until you’ve used up your budget. This method often results in ads not being displayed because the account holder (you) forgets to top up his account. The system is totally secure, so you don’t have to worry about your credit card number being kept on file with Google.